Showing posts with label OPI. Show all posts

Monday, May 11, 2015

Eggshell Nails

I wanted to make a delicate nail design that would reflect the gorgeous colors of egg shells. We are so lucky to have lots of farmers markets in Sonoma County selling farm fresh eggs. They are not only beautiful on the outside, they are also gorgeous on the inside, with richly colored yolks.

I painted each nail with a different egg shell hue, then used MoYou London Explorer plate 03 with Konad White. The base colors are OPI A-Taupe the Space Needle, OPI Did You Ear About Van Gogh?, Orly Decades of Dysfunction, and Color Club Factory Girl.

Thursday, March 5, 2015

Stamping Better than Jamberry

The recent challenge on Adventures in Stamping was to create a design that is better than Jamberry, or other similar nail wraps. Here is my interpretation:


Base coat is OPI Did You Ear About Van Gogh? stamped with Konad white. I used the decal method on my ring finger with acrylic paints. Image is from MoYou London Pro 06.

Thursday, October 16, 2014

31 Day Challenge: Geometric

I am so glad that today's challenge prompt has changed from Tribal to Geometric. I was never comfortable with calling a nail pattern "tribal" unless of course it was referring to a specific tribe and emulated that tribe's artwork. So here is my Geometric nail art: a deconstructed Jack o'Lantern!


I started with a base of OPI Tangerine Scene, and then used my small nail art brush and black acrylic paint to add the geometric shapes in random arrangement. You might also call this a Picasso Pumpkin. And that would be a really fun way to carve a pumpkin! With the facial features all there, but in random places. Ha ha!


Wednesday, October 15, 2014

31 Day Challenge: Delicate

My challenge nails today are somewhat similar to the ones I did in 2011. They are also done with a wallpaper-like background done with stamping. But I think these are a bit scarier. I painted the horrifying little girl from The Ring. (Spoiler alert: if you haven't see The Ring, or don't want to scare the crap out of yourself, don't click on that link.)


I started with a base of OPI Did You Ear About Van Gogh? Then I used a combination of the same polish and Wet n Wild Ebony Hates Chris to stamp the pattern from MoYou London Sailor Plate 05. I wanted a more muted color for the 'wallpaper' so that is why I toned down the black a bit. 


Then I used acrylic paints to paint the evil girl. Here she is partway done. I used a mixture of white, blue, and black to paint her since the movie is really blue toned. 


Then it was time to paint her creepy hair. I should have made her head a bit taller but my nail was not long enough. If you look at pictures of her, her head seems abnormally far from her shoulders. Perhaps that adds to the creepiness of this character. Also, I don't suggest looking at images of her for a long time. It's freaky. bleh. (On a side note, when I moved to California from Washington State, my brother told me about this film as we were driving down I-5. He was so scared by retelling the plot of this movie that he started to cry a little. And it also helped me remember when to close my eyes when I eventually watched The Ring.)


Another super creepy part of this manicure is that I had a really hard time photographing it. Normally there are one or two images that are blurry, but with this manicure at least half of the images were blurry. Ok, freak out time. 

And did you notice I painted her image on my ring finger? See what I did there...


Sunday, October 12, 2014

31 Day Challenge: Stripes

For today's challenge, I made a creepy monster crawling out the darkness. He's modeled loosely on Spike from the movie "Gremlins" LOL!


The base color is OPI I Don't Give A Rotterdam! Then I used striping tape to mark off the black stripe areas on all of my nails, and painted them in with Wet n Wild Ebony Hates Chris. The rest of the details are done with acrylic paints.

Click here to see my stripes challenge from 2011

Friday, October 10, 2014

31 Day Challenge: Gradient

I was trying to figure out what the heck to do for today's prompt that might have something to do with Halloween. I've done the spooky graveyard gradient before, so I decided to try a water colored gradient and attempt a "bobbing for apples" manicure!


The gradient is Color Club Blue-Ming, Color Club Age of Aquarius, and OPI Fly. Okay now, let me tell you that the water ripple effect was a pain in the a$#. I have seen the video tutorial by cutepolish, and I've seen many others do this effect, but it is NOT easy. I tried spray hand-sanitizer, a mix of water and vinegar, and finally tried using a spray leave-in conditioner. It was not consistent and that is why all of the nails look different. If you have any tips, let me know.


Click here to see my gradient nails from 2011

Thursday, October 9, 2014

31 Day Challenge: Rainbow

I am scared of my own nails. Honestly, I can't really look at these too long. *shudder*


For the base I used OPI My Vampire Is Buff, and then stamped each nail with BM301 using red, yellow, green, and blue Konad stamping polish. Pennywise is painted with acrylic paints and pure terror. Sheesh.


Wednesday, October 8, 2014

31 Day Challenge: Metallic

Today's challenge is Metallic nails. I could not think of a better metal than GOLD. Woohoo! I used the real 22K gold leaf topcoat I got from Lori at spectraflair4u.com. It needs to be applied in a dabbing method to work well, but it is such a thrill to say that you have real gold on your finger tips!

I used OPI San-Tan-Tonio as the base, then used the gold topcoat on most of my nails. I added the ring finger design using acrylic paint. There's a skull, a little bug/spider dude, and a bat. I am pretty happy with how it turned out!

Click here to see my metallic nails from 2011.

Thursday, October 2, 2014

31 Day Challenge: Orange

For the orange challenge, I decided to try a jelly sandwich. I then stamped a fun pattern of skulls on my ring finger.


I started with one coat of OPI Y'All Come Back Now Ya Hear? and then used one coat of Sonoma Nail Art Pumpkin Hurl, then added another coat of the OPI polish. I love how squishy and pretty it looks! On my ring finger, I used Konad Black to stamp an image of skulls from Sugar Bubbles SB023. 

Here is what I did for the orange challenge in 2011.

You can buy Sonoma Nail Art Pumpkin Hurl in my esty store now! :)

31 Day Challenge: Red

I am going to attempt the 31 Day Challenge again this year, which I tweaked in 2011 with my own Halloween themed nails. So here goes!


Day 1 is Red. I did these on October 1st, but got too busy to post them yesterday. I used OPI Comet Loves Cupid as the base, then topped with OPI The Show Must Go On. I hand painted the spider web with black acrylic paint, then stamped the spider with BM13 plate. I added a dot of red acrylic paint to the spider so she would be a Black Widow, baby. (BTW, I always mishear the lyrics to that song as "I'm gonna love you like a black little baby." I need my ears checked.)

Click here to see my red nails from 2011.

Here are the different daily challenges, courtesy of Chalkboard Nails.

Friday, March 28, 2014

Baby Magic Manicure

Today's manicure is one I did for The Lacquer Legion monthly challenge. The theme this month is "Lucky" and I thought about things that I consider myself lucky to have for possible subjects. I am so lucky to be Auntie to two darling, smart kids. So today's manicure is of my little nephew, Baby Magic. Magic was born just four days before his mom died, and he is a little treasure. I love him so much! Dealing with the loss of my sister in law has been heart wrenching, but I find that being creative makes the pain hurt a little less.

I started with a base of OPI My Vampire Is Buff. Then I used a water color technique to add splotches of Morgan Taylor Berry Perfection, Orly Fresh, and Sally Hansen Complete Salon Fairy Teal. 

After I topcoated the watercolor layer, I stamped with BM 04 plate using Pure Ice Silver Mercedes. Then I used acrylic paints to add little Baby Magic on my middle finger. His nick name is Magic, his real name is Will. :D I had so much fun painting in his little dimples, which he got from his dad. 

Here is the photo I used for reference. I will have to do a manicure of my niece Molly, too! If Molls will slow down long enough for a picture, that is. Look on social media platforms today to see more Lucky manicures. They will be marked #LLlucky

Have a great day!

Saturday, March 8, 2014

Goldfish Nail Art

Today's manicure is for the Adventures in Stamping challenge: Under the Sea. I sadly found that I don't really own many aquatic stamping plates. Note to self: remedy that! I do however have this gorgeous stamping plate from MoYou London which has a pair of goldfish swimming around each other. An infinite circle of koi. So I combined that stamp with a water technique that I have used previously on another manicure.


I started with a base of Color Club Factory Girl, then used a cosmetic sponge to dab on some OPI Fly in areas. After that I used acrylic paints to add little veins of blue-grey, and light blue to indicate little waves. I used a stamping decal technique and MoYou London plate Suki 09 and Konad Black stamping polish. I filled in the fish with orange and yellow acrylic paints. The stamp decal was a little messy, but I like the effect. It feels lived in, like it's been there a while.

Enjoy!

Friday, February 28, 2014

Adorable Rice Bowl

Today's manicure is something I came up with for two different challenges. One is The Lacquer Legion "Adoration Challenge" - I am super in love with Japanese food (bento boxes RULE) and love all things kawaii, so this mani fits perfectly within that theme. And it also works for the AIS stamping challenge this week, which is purple and orange together.


I used OPI Tangerine Scene as the base color, then used MoYou London Suki 03 Stamping Plate with Konad Black for the stamp decal. I filled in the stamped decal with acrylic paints. If you like bento too, be sure to check out my bento blog.

Have a great week!

Friday, February 14, 2014

Molly and Me Nail Art

I adore my little niece Molly! She is three years old and loves to have her nails painted blue. When she first got her nails painted, she did not want to have anyone wash them for fear that the polish would come off. It took a bit of practice to demonstrate that nail polish can be removed and reapplied, but this girl has the routine DOWN. She's so awesome. I brought along some nail art supplies during my last visit to see family in January. Here is a record of our home nail salon adventure!

I made water transfer decals with her favorite characters from the Pixar Cars movie. She was thrilled with them!

Molly is ready to get her nails done! She had patience for a base coat, decals and topcoat. And she's only three! 

Our nail salon set up complete with nail polish remover, three colors of polish, a shot glass with water for the decals, and the decals I made for Molly. I did accidentally spill a tiny bit of nail polish remover on my brother's dining room table. Shhhh, he'll never know.

After applying the decals and letting them dry, it was time for Playdoh! If I mash enough Playdoh into my brother's table, he'll never notice the little patch of nail polish remover. Plus he'll probably blame it on Molls. Best. Aunt. Evar.

Here's Auntie's nails. I prepped my nails for the Seahawks game during my visit to see my family in Washington state. I've got a 12 for "12th Man" on my middle finger and Sally from Cars on my ring finger. The colors I used are butter LONDON Jaded Jack, OPI Ogre The Top Blue, and Sinful Colors Snow Me White. 

I can't wait for my next visit and nail salon party with my favorite 3-year old.

Thursday, February 6, 2014

Run Lola Run aka Lola Rennt

One of my favorite films is 1998's Run Lola Run (originally "Lola Rennt") starring Franke Potente. At the center of this movie, a woman is trying to save her boyfriend and each scenario ends badly, until she finally finds success. Lola, the hero, runs almost non-stop through the film, but instead of being monotonous, the film is filled with tension and energy. The film style is innovative, the acting is intense, and the soundtrack is elementally entwined in the telling of the story. If you haven't seen it, you should. And please, please, PLEASE watch it in German with subtitles. The English overdub is particularly annoying.
I am developing a set of Powerful Women decals, and I tried this one featuring Lola.

I started with a base of OPI Big Apple Red, then painted on patches of my glitter topper Sonoma Nail Art "Red Flag Warning" (check it out in my etsy shop here). Then I added stamping from Pueen 52 (from the new stamping buffet set) with Konad Black polish. On my ring finger I painted Sinful Colors Snow Me White, and then added my Lola water slide decal. After I top coated it, I added thinned down red and blue polishes to color her hair and tank top. I hand painted the black french tip with Wet 'n Wild Ebony Hates Chris.

This is before I added the stamping and black french tip. I kind of like it this way too. The glitter gives it a fun sense of urgency.

I will soon have some fun news related to the Powerful Women decals I am putting together, so keep checking back for an announcement!

Wednesday, February 5, 2014

Beast Mode Nails

These are the nails I did for the Superbowl on Sunday, and I did them right before we were headed out to watch the game at our favorite watering hole. My husband was chomping at the bit for me to get done already, so we could score good seats to watch the game. And so I am sharing these with a caveat: I didn't have time to moisturize and make sure all of my cleanup/lines looked good. I was kind of horrified to look at close up pictures of this mani. SO DRY! With that in mind...

I deconstructed the Seahawks logo. You can see part of the beak on my index finger, and the eyes on my middle and pinkie fingers. On my ring finger is The Beast from Disney's Beauty and The Beast. For those unfamiliar with the Seahawks, one of the players, Marshawn Lynch, is nicknamed 'Beast Mode' for his amazing skills as a running back. So these are my Beast Mode Nails!

The base colors I used were Zoya Dove, Orly Fresh, OPI Ogre The Top Blue, and Sinful Colors Snow Me White. All of the artwork is done with acrylic paints, then topped with Seche Vite. And obviously no moisturizer. What have we learned from this, kids?! Always moisturize your cuticles!

I think it was totally worth it to keep my husband waiting while I finished these. Can you imagine what would have happened if I hadn't?! LOL

Friday, January 31, 2014

Go SEAHAWKS!

Here is a manicure I did to show off 12th Man team spirit for the Superbowl bound Seattle Seahawks! Yes, I live in 49er country, but I am from Washington State.

I used Orly Fresh and OPI Ogre The Top Blue for the base colors, then topped most of the nails with my Sonoma Nail Art glitter 20,000 Leagues Under The Sea. There are bottles of this color available in my etsy store right now! On my ring finger, I used acrylic paint to freehand a Seahawks logo.

GO HAWKS!

Monday, January 27, 2014

Reinventing the Half Moon Manicure

Ok, so I am not really reinventing the Half Moon mani, but I did try something I have never done before and I did it using only nail polish, no acrylic paints, which is usually what I would reach for with something like this.

I present the Apple Half Moon Manicure! Yes, it is very simple but I like the way it turned out. I used Essie Adore-A-Ball as my base color, then added a tiny half moon of Sinful Colors Innocent, a beautiful apple green colored polish. I modeled this after the Sebastopol Gravenstein Apple, which has lovely red, green, yellow, and white stripes along its skin. Using my nail art brush and tiny amounts of various other nail polishes, I added the stripes. I think I used Sinful Colors Snow Me White, OPI Big Hair Big Nails, and Orly Fresh for the stripes. 


Next I mixed a tiny bit of Wet N Wild Ebony Hates Chris with the Sinful Color Innocent green shade. Again using my tiny nail art brush, I carefully applied it to the top of the apple to give the impression of shading where the stem sits. Then I mixed Wet N Wild Ebony Hates Chris together with OPI San Tan-tonio to make the stem. I added highlights to the top of the apple using Sinful Colors Snow Me White mixed with Innocent, and also a tiny bit of pure Snow Me White. I topped it with Seche Vite quick drying top coat. 

I think this is a fun, unexpected way to wear a half moon manicure. I was inspired to try this reinvention manicure by The Lacquer Legion. Each month there will be a new theme for a nail challenge. This one was really fun! Be sure to check out The Lacquer Legion on facebook.

Have a great day!

Wednesday, April 24, 2013

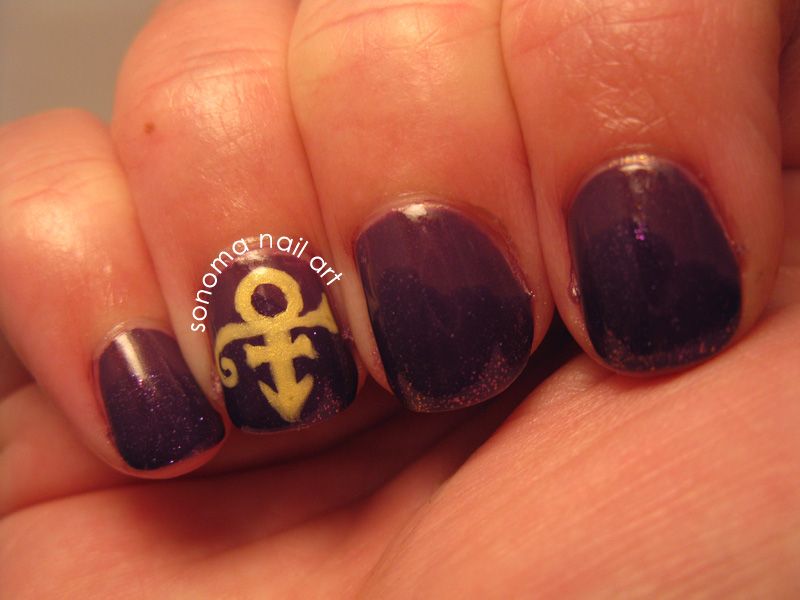
Prince Nails

So I am going to see Prince in a club in San Francisco tonight. AAAAAAAG! I am so excited, I am almost crying. Had to do Prince nails, natch.

I actually like my right hand better than my left! It's the Prince symbol (done with acrylic paints) over OPI Dutch Ya Just Love OPI and Candeo Colors Anochi Kai.

Here is what I painted with my right hand on my left hand. It is more detailed, but I still like the other hand better. That rarely happens. Alright, time to get my funk on! LATER!!!

Monday, January 14, 2013

Chalkboard Nails by Sonoma Nail Art

My friend Sarah of Chalkboard Nails is also my official swatcher and photographer for my nail polish line, Sonoma Nail Art. I have created a nail polish inspired by her blog name and it will be for sale this Friday in my etsy store. I played with it this weekend and tried it with a matte topcoat, so fun!

Here are three layers of Chalkboard Nails by Sonoma Nail Art on my index, middle, and pinkie fingers. On my ring finger I painted two coats of OPI Nein! Nein! Nein! OK Fine! and then sponged on some of the same polish that I lightened with white polish. Then I topped it with a decal I made of Sarah's blog logo. And THEN I put on a coat of Hard Candy Matte-ly In Love. Whew!

As you can see, OPI Nein! Nein! Nein! Ok Fine! is a really close match color wise to Chalkboard Nails by Sonoma Nail Art. If you wanted to use that as a base color with one coat of my polish on top, it would work well. 

Here is the ring finger after I sponged on the lightened polish. All I did was drop a few drips of polish on a piece of card stock, then mixed it with a toothpick, and used a cosmetic sponge to dab it on. It is supposed to mimic the way a chalkboard looks.

And here is the mani before I added a matte topcoat. I think it looks nice either way! Chalkboard Nails will be available in my etsy store this Friday, January 18th, and will sell for $10.50 per bottle. Keep an eye on my facebook page for further updates. You can also WIN a bottle, by entering Sarah's contest here