Showing posts with label blood. Show all posts

Monday, October 8, 2012

Zombie Nails, Rob Zombie Nails

I went there, oh yes I did. Today's Halloween Nail Art Challenge theme is Zombies. I wanted to do something a little different so I did Rob Zombie. HAHAHAHAHA!

Isn't he cute!?

Here's the pic I used as a model. This is Rob's 'happy go lucky' pose. 

I started with a base of OPI I Don't Give A Rotterdam! and then I used OPI Can You Tapas That? for the 'blood' splatter, by dipping a small straw into the polish and blowing it out hard at my two nails. 

Then I cleaned up the blood splatters (wow, that sounds really bad out of context) and started to paint Rob's face using black and white acrylic paints. 

I ended up covering most of the blood splatters on my ring fingernail with Rob Zombie, but that's okay. If you look close, there are a few splats of blood showing in his beard and hair. I think he would approve. :) Of course, always topcoat your creation so that it won't get ruined when you are directing horror movies, or rocking out on stage.

Check out some of the other Zombie nails today! Happy almost Halloween!

UPDATE: Whoops, I am jumping the gun. Zombies is the theme for NEXT Monday. I am all mixed up. Oh well, I will do Ghosts then instead. I have zombie on the brains apparently... wait, did someone say BRAINNNNNSS??

Monday, October 17, 2011

31 Day Nail Art Challenge: Glitter Nails

This was my husband's idea for glitter nails a la Halloween motif. I love it so much! Great idea, honey! I guess you could call this a continuation of the "Tinkerbell on a Murder Spree" nails from a few days ago... She left her victim in the alleyway surrounded by pixie dust!

It's a chalk outline (a glitter chalk outline) of a dead body next to a pool of (glittery) blood. Wow, my hubs is crazy brilliant. 

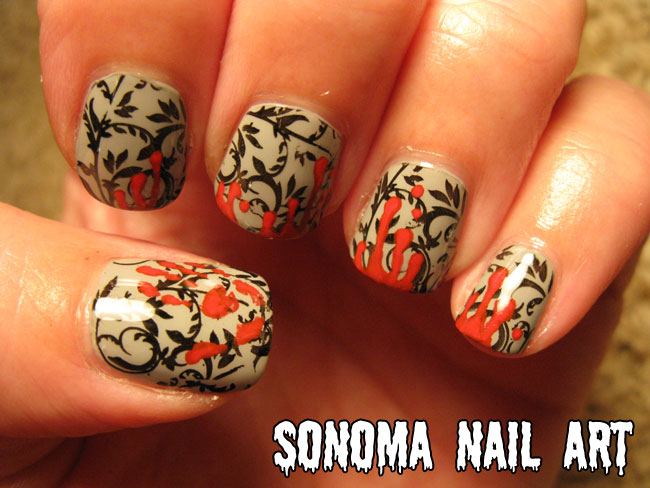
I started this mani with a base polish of this grey shade from Sally Hansen. I did not do clean up yet, because I was adding layers and doing a lot of other messy things to the mani before I was finished, so why waste time with lots of clean up after each stage. OH! And this is ONE coat. I love it!

Next step was sponged on black polish. I wanted this to look like concrete, or a dirty alleyway. It kind of works.

I brushed on a matte topcoat to help with the concrete idea, then taped up my middle and ring fingers to get ready for some blood splatters. 

I followed a method I saw Jen of The PolishAholic do on her site. I used a small drinking straw and dipped it in polish, then blew a short blast of air through the straw to get the splatter effect. See Jen's site for more information on this technique

I cleaned up the nails (and sadly messed up one of the splatters in the process, note to self: don't tape nails quite as closely next time) then added the "chalk" outline in white acrylic paint. 

I added a bit of red glitter polish to the blood splatter to make it a bit more blingy, and then started adding a holographic glitter polish over the chalk outline. My husband will attest to the fact that I was giggling like crazy while I did this. So funny!

Here is an outside picture of the nails so you can see how holographic and sparkly these nails really were. I love it!

I used quite a few polishes for this mani, and only one acrylic paint (usually the opposite for my manis). Polishes used in this manicure: Essie All In One basecoat, Revlon Top Speed in Hazy, Wet 'n Wild Black Creme (sponged on), Warpaint Beauty Matte topcoat (from Hot Topic), Revlon Raven Red for the blood splatters, Fright Night Claw Polish Voodoo for the red glitter on the blood, and Love & Beauty Silver holo glitter polish for the chalk outline. No topcoat (besides the matte topcoat). I really like this matte topcoat. 

Tomorrow's nails: Half Moons! What a perfect challenge for Halloween nails. See you tomorrow!

Saturday, October 15, 2011

31 Day Nail Art Challenge: Delicate Print Nails

I pretty much knew exactly what I was going to do for this challenge. I have Konad (and fauxnad) stamps from when I first got into nail art. I don't do stamping that much now, mostly because I have more fun doing freehand art. But occasionally it is just what the doctor ordered. Like today!

I did a sort of wallpaper pattern with blood spatters and a tiny bloody handprint. That is a really small handprint. It's like Tinkerbell went on a bender and then murdered someone while she was under the influence. Bad faerie!

I started with a grey base polish (forgot to take a pic, sorry), then topped it with this viney stamp from Bundle Monster plate BM17. 

Then I added a bloody handprint with red acrylic paint. I also added a splatter of blood to the side of my thumbnail, but in retrospect, I decided that it made it harder to discern the bloody handprint. I was able to fix this... (keep reading!)

See! I painted over the splatter with the grey polish, then used black acrylic paint to mimic the wallpaper pattern in black. It's like it never existed. But maybe Dexter could find it under a black light.

Here are the polishes I used in this mani: Sally Hansen Xtreme Wear in Wet Cement, Cult Nails Get It On basecoat, and Seche Vite topcoat. (oops, I also used Wet 'n Wild Black Creme for the stamping!)

Tomorrow: tribal nails! How in the world will I turn tribal nails into a Halloween theme? Find out tomorrow!